|
 |
|
![]()
FINISHING
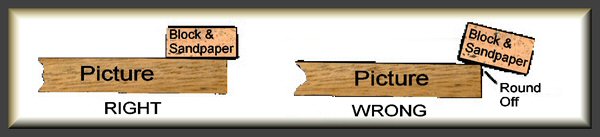
Your picture is now complete and mounted on the backboard. You have put a backing veneer on the board and the edges are complete. What’s left to do? You may well ask because this part of picture making is probably the most boring but, in the end, the most satisfying. We are talking about finishing and polishing. As with most things careful preparation is the key to the final look of the picture, so we will review the sanding procedure. This subject is one where no two people agree completely on method. So we suggest that you try this way and then adapt it as you gain experience. Once the picture has been laid, it is necessary to clean it up prior to polishing. If veneer tape has been used it can be removed by damping (not wetting) the tape and carefully peeling or scraping it off. An alternative is to use a cabinet scraper but many people find these difficult to use. The advantage in using a scraper, not only for removing veneer tapes but also getting the surface smooth and flat, is that the tiny shavings made by the scraper are too big to penetrate into the grains of even the most open pored veneers. Even apart from the rather difficult aspect of using one of these tools, marqueteers are reluctant to use them because of the greater chance of them ‘going through’ the thin veneers, preferring to use sandpaper wrapped around a sanding block to rub the picture smooth and flat. Remember, your veneer is only 0. 6mm thick (approx 1/64 inch) if it's European, or 1 - 2mm thick (approx 1/32 or 1/28 inch) if it's one of the old hand sawn varieties or, if it's an American produced veneer. One important point to remember when using a sanding block is that pores of the veneer tend to fill with dust caused by rubbing and dust from dark veneers can be transferred to the pores of lighter adjacent veneers causing discoloration. In addition, many of the more highly coloured veneers such as PADUAK, ROSA PEROBA, ROSEWOOD, etc have natural pigments that actually leech into lighter veneers such as SYCAMORE, HORSE CHESTNUT and OBECHE staining them considerably. It is therefore absolutely paramount to remove every trace of dust from the pores of the veneers and this can be achieved by using a soft brush. Some marqueteers use the vacuum cleaner to great effect. One way to reduce the chance of pigments leeching is to brush on one coat of sanding sealer carefully before rubbing the picture down. Lay the picture, protected by a soft cloth, face up on a flat surface. Then initially using 120 grade sandpaper wrapped around a sanding block carefully sand the picture flat along the predominant grain direction so as to reduce cross grain scratches. REMEMBER The European veneers are only 1/64th" thick so don’t go at it like a bull in a china shop. Care is the watchword (American veneers however are generally 1/28th" thick). When the picture is flat, reduce the grade of sandpaper to 240 and then 320 to eliminate scratches. Repeat this process for the back, making sure that the front is well protected. When sanding nears the edge of the picture make sure that at least 3/4 of the rubbing block lays flat on the picture. This way you ensure that the edges do not get rounded off. SANDING THE FRONT AND BACK |
 |
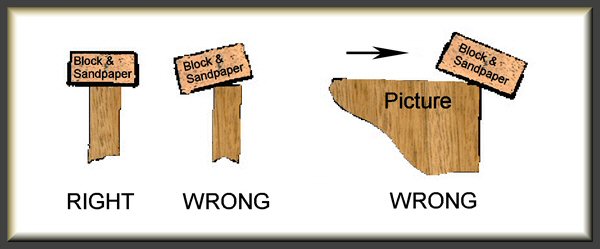
Also make sure that your sandpaper does not get clogged as this can cause gouging in the surface. The edges present a more difficult problem because of their narrowness, but with care, a smooth finish can be obtained. When sanding edges, make sure the block is flat on the edge before starting the sanding stroke otherwise you will roll off the veneer and round off the edge. Also don’t take the block too far over the end as the result will be the same. SANDING THE EDGE |
 |