|
 |
|
![]()
SAND SHADING
In the earlier section on design, we looked at using blocks of colour; sand shading gives the opportunity to create some rather more subtle lighting effects in the picture. The basic idea of sand shading is that the veneer being worked on is lightly scorched, so there will be a browning of the veneer. The amount of heat applied, and the area of veneer shaded gives the final effect. So what, you may say. If we sand shade the petals of a flower, a depth suddenly appears in the picture as the petals take on more character. If we look at a Sheraton oval, by shading one side of each element of the fan, it creates the effect of depth, or movement, in the motif. To sand shade, take a flat bottomed pan, such as a baking tray or a redundant frying pan, and fill to about one inch deep with clean sharp edged silver sand. A source of heat is needed, whatever is available; a camping stove, or a gas ring will do, but an electric hotplate is favourite as the heat will be better distributed; so no hot spots and no naked flame. The sand will need to be heated until it feels hot at a range of 6" - but trial and error will tell you. The only other requirement is a long pair of tweezers, the longer the better. (Spring action "normally closed" tweezers are better. Locking fish disgorgers can be used but watch for the serrations) Using lighter veneer such as sycamore will give more scope for variation as darker colours tend to limit the effect. Start with a few waste bits of veneer, and you will find that the idea is pretty straightforward. There are four ways of sand shading:
NOTE: Always check that the desired effect has been achieved on both sides of the veneer. Veneer has a moisture content of 12.5 to 15%, and you will appreciate that the heat will dry them, which can shrink the well fitting piece into something that bears no relation to what you wanted! To help correct excess drying, try dabbing with a wet cloth; don’t dip the veneer into water as this might put a bit too much in. Once dampened, put the veneer under weight, between absorbent material, such as paper until dry. |
|
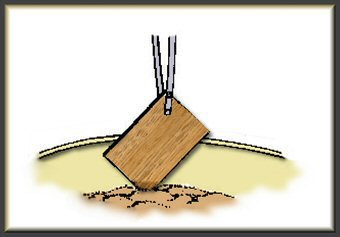 Sand-shading veneer in sand |
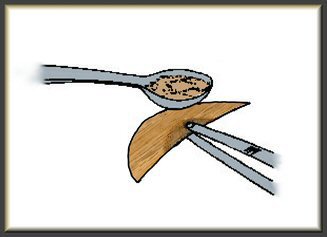 Sand-shading veneer by pouring on hot sand |