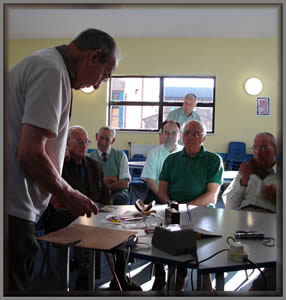
 Alf prepares to start the demonstration while
some of the audience make sure of a good close view!
|
|
This demonstration, which is presented by Alf Murtell, is going to be about Mother of Pearl and its derivative laminates. The following text is a transcript of the dialogue our instructor Alf used for this tutorial. Over to you Alf :
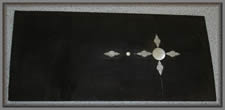
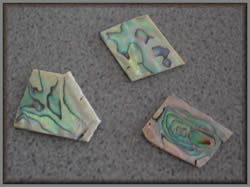
Firstly these geometrical examples you see here are of German origin, take a note of the thickness of the board. The black lines seen in the mother of pearl are made from a type of black cement that has been squeezed into pre-cut saw lines.
You can get mother of pearl pieces through our web site, but bear in mind that it comes in smallish pieces, they supply it in 98 gram bags at about £2.50 each. Do take note though of the actual thickness of the individual pieces,
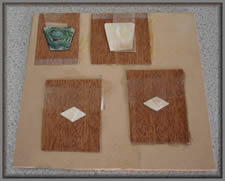
If you are going to use these thicker natural pieces of mother of pearl you’ll first need to make a recess in your baseboard, or the top of your box, or whatever you are going to use it on. But I do have another style of mother of pearl sheet here which is called “laminates”. This will reduce the amount of work you have to do tremendously.
Now these laminates come in a variety of colours, in fact there are about eighteen colours. Do take care when handling it though, please don’t attempt to bend it because it is very brittle.
Now, as I told you earlier, all of these are available through a link on web site and the postage is £2.00 – and that’s no matter how many packets you order it’s still £2.00.
|
 German Mother of Pearl work
|
|
 German Mother of Pearl work
|
|
There’s also another type of mother of pearl, this is called Paua (pronounced “power”) this is a New Zealand shell fish. It’s very colourful, actually a bit darker in tone than mother of pearl, but it has got it’s advantages, but, once again it varies in thickness – “does it smell?” asks a wag – no it doesn’t smell (chuckle from audience)
“Where does mother of pearl come from?” –
|
|
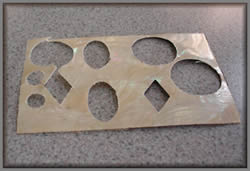
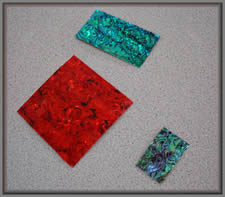 Laminate pieces of Mother of Pearl.
These are supplied in useful sized sheets.
Laminate pieces of Mother of Pearl.
These are supplied in useful sized sheets.
|
|
| it comes from a mollusc that goes by the name of Abalone, that is the main or only, (as far as I know) source of mother of pearl.
Now then, for the cutting, if you are going to attempt to do some cutting, I do very much advise you to use safety goggles, because the shell is inclined to shatter when cutting. And also, if you’re going to do any grinding down of the shell, you should wear a face mask, so, take care with whatever you are going to do when working mother of pearl.
But, I think that when I tell you about using this laminate, you won’t have to worry about grinding down or suchlike. So, the first way I’m going to demonstrate about the cutting of the shell is with using a piercing saw for the task. |
You place your mother of pearl piece in the V opening of the cutting board and with your piercing saw you begin your cut, as you can now see, it cuts reasonably well with the piercing saw.
The next one to use is the mini circular saw. This only takes a few seconds. All right, as you can obviously see, there’s no problem with cutting your mother of pearl with that! The last one we shall now use is the carborundum disc. Make sure you wear your face mask with this one as it produces a lot of dust.
Carborundum grinding stones are available in kit sets, but you should get very good results if you use a similar one to the one I have just used.
“Is it possible to cut, say, a leaf shape in mother of pearl?” – yes, it is possible with either the piercing saw or the disc cutter, but I think you’ll find that you will get the best results when I show you how to make use of the laminates.
Now, the laminates as I said to you are very brittle and they don’t take much to actually break up, so, what I have done is, I’ve reinforced the laminates with masking tape or, stuck them onto a piece of veneer – and you can cut that quite easily with your craft knife.
Now, all those examples you see here were made with the laminate and cut with a craft knife. I think this is your best bet if you are going to use mother of pearl or something of a similar nature, the laminate is much easier to get on with. By the way, I have not removed the masking tape, I did it on one occasion and I found that it pulled the backing away from the mother of pearl which caused it to be damaged, so, I suggest that you do not remove the masking tape. |
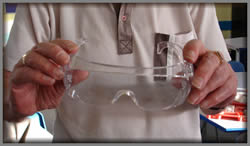
Wear Safety goggles like these when cutting
Mother of Pearl with power tools
|
|
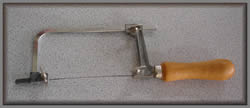
The Piercing Saw
|
|
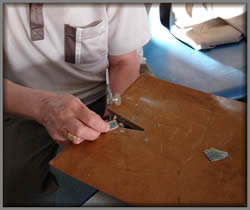
Alf uses the Piercing Saw to cut a piece of
Mother of Pearl blank
|
|
Now I’ll show you some actual examples of the shell in use, here’s some Paua inserted into a recess that’s been hollowed out, it’s now virtually flat with the surrounding veneer.
Right, well I’ll tell you now, do not put your glue on the area of the baseboard where you are going to put your mother of pearl (or laminates) as you will not be able to remove or clean up any intrusive glue over-spill successfully enough to allow your mother of pearl to seat correctly in place just below the level of the surrounding veneer. You put the mother of pearl pieces in after you’ve put your main picture components down and sanded and polished the piece. So, you don’t want anything to interfere with the base area of your picture where the mother of pearl will go – as those will be the last of the pieces to go in, your pieces of mother of pearl.
The last two finished examples here are the piece using the mother of pearl with the masking tape backing and another piece with veneer backing. If you just run your fingers over the surface you will find that the mother of pearl is just below the surface, which is handy if you wish to sand the piece down, or if the veneer is a little bit higher on your laminates you’ve still got the chance to sand down the veneer on the back of your laminates.
And, what I would do if I was going to do this one, which is where I went wrong, you lay your veneer down and mark round with a pencil where you want your mother of pearl piece to go. When you come to put your glue on, you check round the area (or window) for the mother of pearl and keep that hole clear of contact adhesive, or polish or whatever it is, and then, when you come to finish it off, all you’ve got to do is put a couple of spots of super glue on your mother of pearl and just slot it in position.
There’s no need to sand it down because it’s got a protective film over it and I suggest that you leave it on there. And, as you see there, you’ll find that this has been raised slightly just because I have not cleared the surrounding area of glue. So, do not apply any glue to the area where you want to stick your mother of pearl.
Just to go back on things, assume that this is your piece of veneer and this is the area that you are going to place your mother of pearl in, I’ve pencilled round it so that I know that I must not put glue into that area, and you’ll see that I can stick all this veneer down, but that mother of pearl area is completely free of glue. I suggest that when you come to cut out that window for the mother of pearl, save the cut out piece of veneer and place it back in the window while you sand down and polish it or whatever, and, when you’ve done all that, you can now fit your mother of pearl insert in the window. |
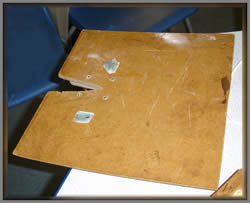
The Cutting Board Alf is using in the above photo.
The two grey pieces you see on the board
are Mother of Pearl pieces waiting to be cut.
These are the standard size of the pieces
usually supplied when purchased.
|
|
|

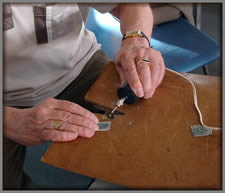
The mini circular saw cutting wheel
is seen on the left of this photo.
The tool on the right is a battery
operated grinding wheel motor which
will
be
fitted with a miniature
carborunum grinding wheel disc.
|
|

A close up view of the mini circular
saw cutting wheel with the cutter
blade fitted in place.
Take great care when using this tool
as they can cut fingers as well as shell |
|
Alf seen using the mini circular saw.
Alf is wearing protective glasses and
is accomplished with this tool.
If you are new to this, clamp the work down
and use the tool appropriately.
|
|
|
|
“When you come to do your finishing, the mother of pearl will be proud or raised, so how do you go about finishing that?” - well, as I’ve just said to you, if you use the laminate the surface will be lower than the main picture veneers, so by the time you sand the veneers down and polish, you will be equal distance between the mother of pearl and the picture veneers. If you look at that demonstration piece you will see how the finished results work correctly.
“When you stuck the veneer backing to the laminate, what glue did you use for that task?” – I used Thixofix and you’ll see that was cut out with a craft knife – and I just used a template to cut out the circle and then cut the mother of pearl out. If you wanted to, you could use an emery board to smooth off any rough edges.
“Those fine lines you have in one of your demonstration pieces, how were they done?” – they were done with a saw. This was a German example where they used a saw to cut strips of mother of pearl. They made holes in the veneer of the shapes they wanted then they put the pieces of mother of pearl in the holes and put black cement over the back, they let it dry in the pre-cut gaps made in the mother of pearl inserts and there, basically, is the finished product. Do bear in mind though that the board is fairly thick. |
Three pieces of Mother of Pearl blank
as seen in the examples on the
Cutting board above left.
|
|
|
|
Shaped pieces of Mother of Pearl
shown placed in their respective
pre-shaped slots in some sample
veneer blanks
|
|

The two top pieces removed from their slots
to demonstrate the technique |
|
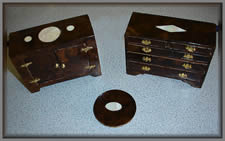
Three miniature pieces of furniture
with Mother of Pearl inserts
which have been fitted and
finished using the techniques
described in this demonstration
and tutorial
|
|
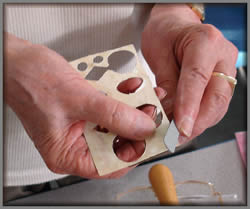
Cleaning rough edges with an emery board
|
|
“Did you cut those rosettes?” – no, that was cut by that German method we have just been talking about, but it does none the less show what you can do with mother of pearl.
“Would mother of pearl be permissible in a marquetry picture if you were to enter it for a national?” – yes, indeed, mother of pearl is one of the permitted elements of a marquetry picture, indeed, even metal can be used. “Would they take marks off if you were to enter such a picture in a marquetry competition?” – no, it’s all part of the marquetry ethos, it’s part of your picture, if you were to put it in a frame and submit it you would be quite okay.
Funnily enough, I remember years ago there was a picture containing aluminium put in to a national – there wasn’t a lot of it in the picture, but there was some. “You can use brass can’t you?” – yes brass, brass inlay – someone even used glass!
“I’ve even seen a watch placed in a picture!” – that’s right, there was a watch stuck in there in someone’s picture!
|
Shapes cut from a laminate blank with a
standard craft knife
|
|
To go back, I think that this laminate has great possibilities, it has around eighteen colours.
“What’s the price work out for those laminates?” – I believe a piece eight inches by eight inches is about fifteen pounds, so as I say, you can’t really afford to buy lots of this and just stock it way unless you’re very careful with it, but I can see great possibilities with it. As someone said to me last week, it would make a splendid use for something like animals eyes – and I think there is definitely that possibility for it.
“Would it make a good peacock’s tail?” – yes indeed, that’s another good possibility for it, a very good example. I think it’s wonderful the uses for it – and, it’s easy to handle. You haven’t got to worry about cutting it with a saw, or circular saw, or anything like that, it’s all cut-able with your craft knife – but, do first put a backing on it, either veneer or masking tape.
“Is that the only size you can buy, can you buy smaller bits?” – oh yes, you can buy smaller pieces, for instance that, it’s about two by four inches as a laminate, and that’s about two pounds fifty plus a pound for postage.
|
He is very helpful this chap that I have been dealing with, his company’s name is “Pietra Dura” and it is located at Aylesbury and a link to his web site is on the marquetry society and Redbridge group web sites. He is the chap to contact if you want any mother of pearl. There's actually a short cut to the Links Page at the bottom of this page for your convenience.
“Will that laminate cut easy with a craft knife?” – it will cut easy as long as you put a backing on it, either masking tape or veneer.
“Do you cut it from the back?” – oh yes, you cut it from the back, you must put the protective film on it and I advise you not to take it off – and don’t forget, this mother of pearl goes in at the very last after you’ve polished your picture or whatever you’re making – this goes in at the very last. Just put a couple of spots of super glue on it and place it in position. There’s no need to do anything further with it. That’s how I did these examples, they’ve been done with super glue.
Here’s some of the supplier’s notes here: thin cut Abalone shell is £2.99 – four by four red tint is £4.99 and the electric blue at two by four is £2. 99 and he only charges a pound for this sort of product for postage. It doesn’t matter how much you order, it’s still a pound. But, if you order packets of Paua it’s two pounds postage, but you can order a dozen of these and it’s still two pounds postage. I believe it’s 98 grams he sells these as, but you are limited to the size of the pieces you get, I mean you won’t get big sheets or anything like that.
What you must remember is that these are all different thicknesses, some you will find will taper towards the end, you know, so you’ve got to appreciate that the pieces you get will vary a little due to the genuine organic nature of the product.
Thank you. End of this demonstration.
For countries other than the UK, please enquire to the supplier for appropriate charges as the prices mentioned by Alf in this tutorial apply in principle to the UK mainland only and cannot be verified by the Marquetry Society. Also please note that the prices mentioned may be liable to change without prior notice, so again please contact the supplier for accurate up to date pricing - not the Marquetry Society.
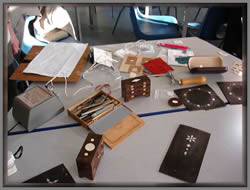
Some of the paraphenalia used for this tutorial
|
|
|